Tuesday, November 29, 2011

Happy Belated Thanksgiving!

I'm late on the bandwagon, as always, but Happy Thanksgiving to all!  I made this little table c over for the festivities and was super excited to plant flowers in pumpkins for the first time (it's the little things, right?). 
This was my first real applique project.  You all know I sew mostly clothing, but I'm trying to get a little craftier.  The pattern is from a book A Fresh Look at Seasonal Quilts by Julie Popa.  It's actually on the cover.  I used my embroidery machine for the words.

 I like how the author recommended using wool for some appliques to add dimension.  I'll definitely be making more from this book!

Wednesday, November 9, 2011

Striped tee on me!

Here is my new striped top mentioned here.  The pattern I used to start was my usual out of print Butterick 3344.  I added the sleeve tabs and buttoned neck treatment myself.  I also had a couple more inches taken off of my hair. :-)


Monday, November 7, 2011

Striped tee finished

I finished up the striped top I mentioned here.  The fabric is Ines from Sawyer Brook, and it is a dream.  I'm glad I have enough left for a tank top... or maybe something for my little niece.  It's time she learned the necessity of the striped tee.  The buttons are Ruffle, also from Sawyer Brook.  I'll take photos on myself when I wear it tomorrow, but for now, here it is.


Saturday, November 5, 2011

McCalls 5759 progress

I haven't stopped work on McCalls 5759.  Just procrastinated a bit because I decided to put actual welt pockets under the pocket flaps provided in the pattern.  I finished up both the welts and the flaps today, so next comes the sleeves and then the shell will be finished.  Of course, I plan to add buttons to the sleeve cuffs, so that would go super fast either.


The inside of the pockets.  Looks pretty messy, but it works.


With flaps:


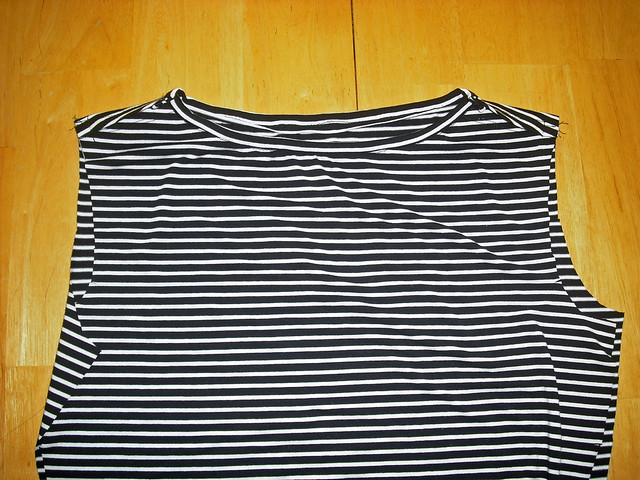
Striped tee in progress

Here are some details on a quick striped top I whipped up.  I just need buttons for the foldover shoulders and sleeve tabs to finish it up.

Wednesday, November 2, 2011

Circle Skirt Tutorial and a math lesson

I made this Circle Skirt right before my trip to Colombia and then forgot to take it (of course!)  I modeled it yesterday without really styling the upper half - it's my outfit from here.

It's actually a half-circle skirt, which I prefer.  A full circle is just too overwhelming for me, unless the fabric is super drapey.

The fabric I used is one of the Linton Tweeds I got on my trip to Great Britain a year and a half ago.  I figured it was about time I sew one of them into a garment!


Here is a little math lesson that will help you make a half-circle skirt.

I had a meter of fabric and wanted the skirt to be below-knee "midi" length.  To make a half circle as long as possible, I first folded my fabric in half, selvage to selvage (fold is at the bottom of this photo).  Then, I folded one end to the fold to make a triangle.


I used my trusty tape measure like a compass (remember those puppies from 4th grade math??) to measure and cut an accurrate 1/8th circle shape, keeping an even distance from the point at the right of the photo.


So now I have a lovely half circle.  Next, I have to cut a smaller half circle out for the waist.  This is where the geometry comes in.  Stick with me...


Here's my little sticky note of 'rithmetic.  Let me break it down:
My waist, where I want the skirt to sit, measures 30". 
2 pi R = the circumference of a circle, but I'm only cutting out a half circle, so...
30" = (1/2) 2 pi R
30" = pi R
30" = 3.14 R
30"/3.14 = R
9.55" = R
Any math teachers out there?  Do I get credit for showing my work?


So the radius of my half circle to cut out is 9.55", so I measure 9.55" all around from the center fold of the half circle.  (The diameter of the circle is 19.1


After that, i just cut a strip about 32" long for the waistband and stabilized it with some iron-on interfacing and grosgrain ribbon for fun.

I attatched the waistband to the skirt and lining (cut exactly the same as the tweed) and added a zipper in the one back seam. 

In the end, my 1 meter of fabric wasn't long enough for the below-knee length I wanted, so I cut a strip on the straight grain  and stitched it to the bottom of the skirt.  After a  bunch of steaming and pressing, I think it looks nice and adds a bit of interest to this super simple skirt.

Tuesday, November 1, 2011

Knock-off of Pottery Barn Mirror

When I saw this tutorial on The Lettered Cottage, I knew I HAD to make this gorgeous mirror.  Almost a year later, it's finished.  Actually, it's been finished for a few weeks and it just occured to me to take a photo today.  The reason it occured to me was to join this link party.


I opened the front door to let in some more natural light.  I also made the wreath by hot gluing a bunch of fallish fake flowers from JoAnns onto a stick wreath.  Not exactly groundbreaking, but it's cute.  :-)


I don't have much to say about this other than I followed Kevin and Layla's instructions.  I had to use a different kind of hanger because this thang is HEAVY.  I also used 6 12"x12" mirrors instead of their 12 8"x8"s.  It's just the size I found on sale at Target.  I also ommitted the little decorative tacks they used.  The reflection in the mirror is of the office double doors. 

Happy Halloween!

Saturday, we had a Halloween party to attend.  I bought green fairy wings at Target.  At 9 pm Friday, I decided to make a Tinkerbell costume.  At 10:50, I had this:


I may be the only person to have ever boned a knit dress (maybe, but probably not).  Whatever.  It stays put AND I didn't have to put in a zipper.  The white at the top is a strip of elastic. 

It turned out to be a fun costume, appreciated by many... but not my 1-year-old neighbor who also dressed as Tinkerbell tonight.  I think I distinctly heard he mutter "Poser" in my general direction.

In slightly related news, I wore this today for Halloween.  I could swear I blogged this top, which I made like three years ago, but I can't find it in my archives.  It's just a sweater knit made into my TNT tee shirt with a wrapover top, kind of like this but without the gathers or the bit hanging down.