Monday, February 22, 2010

Red Sweater Plan

I'm finishing up a black corduroy skirt and spent the past two evenings cutting out a jacket, but knits are still on my mind. I have a piece of blood-red sweater knit that is calling to me (not to mention brown and purple rayon jerseys begging to become comfy, flowy tops). I think I'll sew on my skirt's button loop tonight to finish that off and start sewing my jacket. When I get to the point where I need to sew up something pretty quick, I'll make that red sweater.

I'm trying to decide on a style. I want a cardigan. I could use another cardigan more than another pullover sweater. These are some ideas:

This is a pretty classic v-neck cardi with bold buttons that's "in" right now. I like the little welt pockets and would add those on mine, too. I also have an idea how to do the neckband treatment after making this top.


This one's cute, too. I like the little tie and it would be easy to make (no buttonholes!), but I couldn't really leave it open then.


This looks easy and could hang open or I could try belting it. I'm not sure I'm ready to try something so similar to this disappointment yet, though.


All photos are from jcrew.com. Click on pics to get to their respective webpages.

Please weigh in so I am not paralyzed with indecision! What do you think? Do you like any of these? Any other ideas?

Saturday, February 20, 2010

Orange Dots!

Here is my cute new top, which I love. It makes me feel so ready for spring. It was in the 40s today here, so I wore it even though it is February. Take THAT, Jack Frost.


Ok, let me level with you - the reason the pic is cropped so close is that my fly was halfway down and I wasn't about to take more pictures. There. Now that info is out in cyberspace forever. And if I'm looking a little rough, it might be due to operating on 4 hours sleep today... teething baby. Nuff said.

Enough TMI. Here's some info on the shirt:
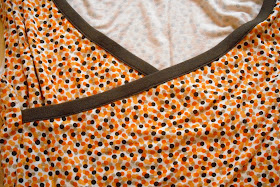
Fabric is rayon jersey from Sawyer Brook. Sorry, it sold out pretty quickly. The brown band is also rayon jersey from Sawyer Brook. I am so proud of that little band. It's so even and perfect (not to brag or anything, but yeah it is). I came up with a method all by myself, although I'm sure someone came up with it first:

I used Steam-a-seam to bond the brown band to the neckline, right sides together. Then, without stitching at all, I folded the band around the neck edge and topstitched. That's it. The ironed bond kept everything together perfectly until the top stitching, and it is perfectly even thanks to the 1/2 inch tape. I'll definitely be using this method again. It wouldn't work for a tight neckline, but for this or a V neck, it's great.

The basic pattern is just a copy of a RTW knit top I sacrificed last summer. I eyeballed the neckline and think it's a good depth. I don't need a cami and there is no issue with it getting distorted around my bust.

That's all I got.

I do want to answer Gail who asked:
"stupid beginner question here: how do you get a straight hem? i rmember as a young child standing still as my grandma or older sister would pin the hem line up to make sure it was all even. i don't have another adult to do that for me, so how does one make sure hems are straight (without having a dressform)??? thanks!!"

Ha! I have those same memories... standing on a kitchen chair while my mom meticulously measured up with a yard stick to make sure it was even (are you reading today, Mom?) Well, I'm not nearly so careful, I guess. I stand in front of a mirror wearing my creation and fiddle with pinning up two or three places so the front hem is where I want it. Then, I take it off and pin up the rest, just measuring up evenly from the bottom. If I want to double check, I'll put it back on and look in the mirror again, but when I'm feeling lucky, I just sew. I can't remember having any crazy uneven hems with this method.

Does anyone else have any hemming tricks?

Friday, February 19, 2010

top sneak peek

Here's a look at the quick knit top I'm working on (yep, another one).

I cut and sewed most of it last night. It just needs sleeves and a hem this evening.

I've been sewing... just need a few notions to finish up a black corduroy skirt, and I spent a lot of time on another version of this skirt, which I think is another wadder. :-(

Tuesday, February 9, 2010

Making it up

In case you are curious about the "make-it-up-as-I-go-along" method sometimes used in my construction, I'll walk you through the process:


So here is the photo I showed at the bottom of this post. This is my blank slate. Use whatever basic tee shirt pattern fits you. After you put the shirt together, try it on and, using a mirror, stick pins where you want the neckline to be. If you look closely, you can see my pins in the photo above. It's going to be a V-neck henley.

Here are the pins again. I'm checking the length of the button-area with my buttons. No measuring here!


Measure to make sure the pins are spaced equally from each armhole/side seam.


Cut with reckless abandon by the pins!! Make sure to leave a seam allowance around the neck edge. The button part is just a slit. If you wanted to, you could draw the neckline with disappearing ink or chalk first.


Measure around the neckline to see how long the neckband/button band needs to be. Cut the actual neckband a couple inches shorter than the measurement and stretch it around the neck edge so it will hug the neck instead of sticking up. The width of this piece is 2x the desired finished neckband width + 2x the seam allowance.


My neckband is 1.5" and my seam allowance is .5", so my neckband piece was 4" wide.


Next, stabilize the neckline where you will stitch. I haven't done this often before, but I will definitely do it in the future. This pre-cut strip was easy to iron on, too. No worries about stretching out the neckline. I just wish I'd used a bigger piece (instead of the strip) at the bottom of the slit before I cut it.


Stitch the neckband/button band piece to the neckline and slit edge.


This is a little tricky for me to explain: Wrap the neckband/button band around itself and to the back, making sure the finished front is an even width (my band is 1.5" wide). Pin and stitch in the ditch on the right side between the body and neckband/button band to secure the band on the wrong side. Trim the excess on the wrong side.


Stitch the bottoms of the button band sections to the bottom of the slit (another hard part for me to explain - should have taken a pic of the process). This is where I wish I had more zealously interfaced the bottom of the slit. You can see it's a bit stretched out on the right. I was able to press this mostly out (and let's not forget it's a pajama shirt!), but it's not perfect. :-(

Add button holes and buttons (sorry, no pic)

And, voila! The finished product.


Since this is a jamie shirt, I wanted it to be really comfy. If I were to make this for daywear, I'd interface that button band. The fabric I used is bamboo/cotton interlock from Fabric.com - sooooooo soft and snuggly. I may need more in the future to make a whole pajama set including comfy pants or shorts.

Sunday, February 7, 2010

New Jammies!

I made myself jammies for the first time. I finished the top a few days ago and will cover it in my next post sometime this week. I cut out and sewed the pants last night, while watching The Fellowship of the Rings and still had time to paint my nails before the movie was over.


The pattern is Burda 7765. I made a 38 straight from the envelope, but made the rise about half what the pattern shows. I did this because I wanted them a bit low-rise, and I also didn't have much fabric and wanted to make them as long as possible. I also cut a separate waist-facing piece instead of cut-on as the pattern showed.


I ordered the fabric from fabric.com. It's an Amy Butler design. She made some flannel in this collection ("Love"). I'm an idiot and thought it was ALL flannel, but this isn't. When it came and I realized my error, I thought about returning it, but then figured - it was my mistake and the fabric is perfectly nice cotton. So, now I have cotton PJ pants instead of flannel. They'll take me into spring. :-)


For the waistband, I used some elastic, 1 1/2" wide, I think. I measured the length by putting around my hips at about the right spot, pulling so it was snug enough to stay up, but still really comfy, and left a little overlap. I sewed the elastic in a ring, then stretched and sewed the elastic ring into the wrong-side of the waistband facing with a big zigzag. Then, I double-folded over the facing and stitched it to the pants, below the elastic, so it looks like an elastic casing, but the elastic is stitched down so it doesn't twist or shift. If anyone is curious about this, I'll take photos of my crazy made-up method next time.

I also added a separate band to the bottom of each leg to make them a tad bit longer.

And just for funsies, let's close with a booty shot. These fit really well! I'll definitely be making more...

Saturday, February 6, 2010

Plaid A-line skirt


I have a love/hate relationship with plaid skirts. I love how they look, and you can't beat the ease-of-sewing factor, but after 4 years of a high school uniform, I'm always a little afraid of looking juvenile. I hope I look like a grown-up!


I purchased the fabric last weekend (along with two other pieces - bad Jenny!). It was fairly reasonably priced, on sale since they're moving in spring stuff, and sooooo pretty. I just got .60 meter for a little skirt. I thought about a pencil skirt but decided on A-line since it gives me a little more wiggle room for sitting on the floor and picking up kids and stuff. Yeah, I really did wear this one day this week. We went to get a little boy's haircut, so there wasn't too much playing on the floor that day.


The pattern is McCall 2029, out of print. I've used it before here and here. As with the previous two times, I left off the waistband.


Here's my invisible zipper. Not too bad for not having an invisible zipper foot. Oh, I can't WAIT to get my new machine within the next 6 months!


Here's the lining. Sewing the lining to the zipper was the only hand-sewing on this skirt, and it only took about 15 minutes. I used black silk shantung. I had it in my stash and have no plans to use it before we move this summer, so it's going to be luxurious linings. :-) I like that it's heavy for a lining and adds some heft and warmth to the skirt.