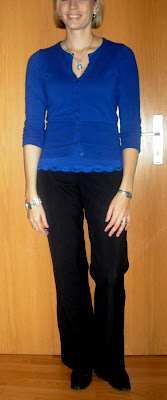
My latest quick little project was another version of this RTW top. The fabric is an old cotton knit from my stash. It's not the best fabric, but it's ok for a little tee shirt. This first photo is the closest to the actual color - pale-ish blue leaning toward periwinkle.
Well, actually, the fabric wasn't the best fit for this top. The original and my first recreated version are in jersey. This cotton knit is a bit beefier with less stretch, so my arms feel a bit like they're in sausage casings, although I don't think the shirt looks super tight on. Also, the top part doesn't drape nicely. It gives me a serious uni-boob and doesn't reach all the way under my bust easily.
All in all, another so-so project, but it only took two evenings of work. It probably won't last in my closet more than a year or so, but I can't bring myself to get rid of it right away, even though I don't LOVE it. It's a perfectly fine top. I do like it today under my new sweater (X-mas present from my hubby). It's nice and cozy for ANOTHER snowy day today.
...and here's a sneak peek at what's up next. I'm going to walk you through my patent-pending (ok, not really) "make-it-up-as-you-go-along method of neckline construction.
Friday, January 29, 2010
Wednesday, January 27, 2010
Vogue 8409
This dress has been sitting on the back of my sewing chair for almost two years. I just finished the hem a couple of days ago. I can rest easy in the knowledge that I'm much better at either finishing or tossing things now than I was two years ago. I only have a couple UFOs still laying around that I want to finish. The pattern is Vogue 8409.
The interesting thing about this dress is seeing how far I've come in the past two years of sewing. I'd been sewing for many years before I made this dress, but never as fervently as the past two years (not coincidently, since I became a SAHM). Anyway, I won't be showing you any inside shots. It's embarrassing. :-) Let's just say, I treated the dress and lining as one when I put in the zipper instead of hand stitching the lining over the zipper. Not sure why I did that. I knew better! Lazy, I guess.
Overall, I'm really happy with it, though... the outside, at least. It fits very well, despite having an entire pregnancy and baby while this languished unfinished. I'll definitely wear it to church come spring and summer. I'm kind of regretting going the lazy way when taking the photos and not accessorizing at all. That's a new, late New Year's resolution - better photos, at least where staging is concerned.
The fabric is poly satin from a German department store here. The lining is horrible, very cheap poly. I definitely wouldn't buy that again, not that I remember what it is.
My Pattern Review is here.
Monday, January 25, 2010
A miss and a tee shirt.
I was going for something similar to this, but instead, I got this:
I really liked the orange jersey fabric when I bought it, but after pre-washing, it's not really soft (maybe lower-quality poly?), and then I botched up the sewing pretty well - I'm not sure why, but the armhole seams are pretty wobbly. On top of that, the fit is a bit big, and it just kind of feels like a choir robe. To top it off, I didn't think out the hemming in advance well enough, and where the collar thing folds back, you see the wrong side of the hem on the bottom. Ehh, it's going in the trash.
This is a simple t shirt I made from the remnants from this top. It's ok. Not my favorite thing I've made or anything, but it's a fine t shirt. I used the same raglan t shirt pattern as a starting point. I was going to make it 3/4 sleeves, but only had enough fabric for short.
I think it looks cute peeking out from under a sweater.
Tuesday, January 19, 2010
Little boy sewing
I thought those of you with little girls had all the sewing fun... until a certain need arose. My son has a lovely new red guitar from his aunt (which he looooooves), but it was difficult for him to hold and strum at the same time. Enter Mommy to make a custom guitar strap!
Ok, so it's a rectangle of fabric with batting and buttonholes, but I am proud!
Apparently he's decided he's going to be a left-handed guitar player. He always puts it on that way.
And, yeah, he insists on holding it around his neck like that, not behind his back like most guitar players.
Ok, so it's a rectangle of fabric with batting and buttonholes, but I am proud!
Apparently he's decided he's going to be a left-handed guitar player. He always puts it on that way.
And, yeah, he insists on holding it around his neck like that, not behind his back like most guitar players.
Sunday, January 17, 2010
Wearable Muslin
I made a wearable muslin** of this free BurdaStyle skirt. I love all the pleats, the asymmetry, and the topstitching.
After making up most of it last night, I decided I still love it, but I'm not going to finish this one. The fabric I used (black cotton, with a kind of linen-y texture) just looks cheap made up in this pattern. It just a case of a bad fabric/pattern matchup by me. I was hoping for a cute, season-spanning, casual black skirt, but I'm not loving it. Luckily, I'm not in love with this fabric or anything (it's of really old stash vintage), so no big loss. I'll definitely try the skirt again, probably in wool.
Here's the back:
a pretty simple 4-gore, A-line. I think I'll carry the yoke around to the back for my next version, though.
Here's a close up of all the topstitching. I used regular thread instead of thick topstitching thread because it became quickly apparent that I didn't love this skirt. I still wanted to see how it all looked, though.
Overall, I still LOVE the pattern, but I'll need a nicer fabric to do it justice. Also, it's a bit big (only a 40 is drafted and I'm generally a 36 or 38), so I'll need to alter the pieces a bit for the final version.
** People can get kind of violent with their wearable muslin opinions. "A MUSLIN IS NOT WEARABLE!!" yada yada yada. I make them from time to time if 1) I want to try out a pattern before moving to the "good" fabric (the usual reason for making a muslin) and 2) I have a fabric on hand that may or may not make a great garment, and I won't be devastated if it doesn't pan out. Please don't judge me.
Friday, January 15, 2010
Striped cowl followup
This is a follow-up to my striped cowl top post. In case you missed it, here it is:
So you can see the proportions a bit better, here is the front:
...and the back:
I made a similar style neckline this past summer, but I can't find a blog post about it, so I guess I missed it. Anyway, I learned some things while making that that I incorporated here. First, I always need a bigger piece of fabric for the cowl than I think I will. I had plenty of fabric this time around, so I made a second one when the first wasn't big and floppy enough. Along the same lines, the neckline needs to be pretty low if you want to show a little neck and upper chest skin.
For my first cowl attempt, I measuered the neckline I had cut and just made a rectangle that length. However, after I sewed it on, it wasn't as big as I wanted, so I made a new one, adding about 5 inches and stretching the shirt's front neckline a bit to fit. Much better! In the end, the cowl is 33" around and 14" deep.
Here's a shot inside the neckline. I used a french seam here since it's possible this seam could be exposed depending on how the neckline falls.
The pattern I started with was Simplicity 3536, which I picked because I already had it, it has raglan sleeves and didn't require me to trace anything (BWOF). I'd recommend finding a simpler pattern to start with, though. I had to fold out the gathers.
I think I answered all the questions. One more:
What Would a Nerd Wear said...
wait, you MADE this??
are you selling these anywhere?
this is seriously fabulous and completely my style--i love it!!
Aw, thanks! Nope, definitely not selling. I don't have the original ideas to make and sell stuff... just making knock offs. :-) You alter stuff, though, so you're just a few steps away from making your own!
Wednesday, January 13, 2010
Quicky sweater project
This sweater was my husband's. Somehow it shrunk... no one wants to take responsibility... True, I do most (almost all) of the laundry, but I have a near-flawless record, people!! Ok, anyway, this sweater was my husband's until it shrunk. I couldn't part with it, though. It's a really nice sweater! So after a year or so marinating with my fabrics and other messed-up clothes I can't part with, I decided I could make it a sweater for me.
Before:
After:
this was so easy. The sweater was the right length, but the sleeves were too short, so I made them 3/4. I just cut off the sleeves, took in the side seams, made the sleeves narrower, took a bit off the tops of the sleeves, and put the sleeves back in.
Tomorrow, I'll do a follow-up post to my striped cowl since there were a few questions.
Sunday, January 10, 2010
Striped cowl top
Oh my gosh, I love this so much. I want to wear it every day!
For the pattern, I just used a raglan knit top pattern I had. I made up the cowl neck, sleeve treatment, and shirttail hem to look like the Anthropologie top. The fabric is cotton interlock from Chez Ami.
The tabs are just decorative. I didn't bother making buttonholes. :-)
For the pattern, I just used a raglan knit top pattern I had. I made up the cowl neck, sleeve treatment, and shirttail hem to look like the Anthropologie top. The fabric is cotton interlock from Chez Ami.
The tabs are just decorative. I didn't bother making buttonholes. :-)
Friday, January 8, 2010
My next move
Having completed the black pants, I knew I should get back to sewing decorative pillow covers for my couch, but I just couldn't stomach that quite yet. (What is my problem with home dec sewing?) Instead, I started making a top heavily inspired by this one from Anthropologie.
It's all done, except I need to find buttons for the little sleeve tabs. Mine has raglan sleeves and is made from a larger striped, thicker knit, but other than that, yeah, I ripped it off. It's just a marriage of all my favorite things: stripes, cowl, 3/4 sleeves. Plus, I like the little shirttail hem.
I did want to answer Emily's question from my black pants post:
How did you do the lining in the pants??? Especially around the zipper?
This pants pattern doesn't have pattern pieces or instructions for lining. I'll try to explain the best I can since I didn't take any pictures. To cut the lining, I just used the regular pants pattern pieces, but you have to make sure on the front piece, you cut the fabric straight up at the pockets instead of how it's drafted for front pockets. To assemble, stitch the inseams first, then the crotch seam, leaving open where it will attach to the zipper. Next, sew the outer leg seams and then put the lining in the pants, wrong sides together, and baste the top edges together. Treat the pants and lining as one when adding the waistband. The final step is to hand-sew the lining around the zipper. There's probably an easier way to do this (not using the hand sewing), but it only takes a couple of minutes and looks nice. Next time I line some pants, I'll take a couple of pics.
I used nude lining since that's what I had on hand. I would have preferred black, but not enough to get my butt in the car and go buy some!
Thursday, January 7, 2010
Boring black pants
I needed some black pants... really! A few months ago, I got rid of two pair of black dress pants that really didn't fit well and were about seven years old and showing it. In hind sight, I probably should have kept at least one pair until I found some that were better. Anyway...
Here is my second version of Simplicity 2700.
I don't have much to say. I'm really happy with them. The fit is very good. I made a 10 this time (last time I started with a 12) and only needed to take in the sides about 1/4 inch.
I think my little man thought we were taking mug shots. He doesn't need a nap anymore, so expect to see him more in the photo shoots. I used to do them during his naptime.
Here's a look at the waistband.
Sunday, January 3, 2010
My new haircut
To ring in the new year, I cut 6 inches off my hair. It's not the first time I've gone this short, so I knew what to expect. Not the first time I've cut my own hair, either, so I wasn't too nervous. It is the first time I've cut off this much hair all at once by myself. I'm happy with how it came out. :-)
and I think it's quite versatile, too!
Why I cut my own hair:
1. I don't have a stylist here I'm really comfortable with or who has done a great job in the past. Not saying there aren't good stylists in Germany... I just haven't found them.
2. When I've gone to stylists here, I've left underwhelmed. It's never been exactly what I wanted. Maybe I'm hard to please.
3. I have the attitude that it'll always grow back. It's fun! :-)
4. Gosh darn it, I do a good job... and it's cheap!
Saturday, January 2, 2010
Rosamund's Cardigan
This is Rosamund's Cardigan from Interweave Knits magazine Fall 2009.
The yarn is Elann's Peruvian Pure Alpaca. The tweedy texture yarn is either out of stock or out of production now. The yarn had been in my stash for several years, and I'm happy to have used it. I love it.
The only changes I made were to adjust the number of stitches for a different gauge and use the stockinette stitch side as the right side. Reverse stockinette always just looks to me like my sweater is inside out! Because of this, the cables don't stand out quite as much as they do on the original, but they're still beautiful.
I also omitted the hooks and eyes down the front and went with the flowy opening.
I really love this sweater and wear it more often than I've worn anything else I've knitted in the past. I love the simplicity of the plain background with just a border of cables. I love the softness and warmth. I love that the opening is off-center. That's what really makes this sweater special, I think.
I also love my pretty buttons. Yea for Jo-Ann's cute buttons!
I made the brown turtleneck from some jersey I picked up at a fabric market here in Germany. The subtle, heathered texture works well with the tweedy yarn, I think, but doesn't compete for attention. The pattern is just my TNT tee shirt which is out of print. I made the turtleneck by folding a leftover rectangle of fabric and stitching it to the neckline. Easy peasy.
Next time, I could make it a bit snugger, but I do like the very subtle drapiness of the neckline.
Friday, January 1, 2010
My resolutions
I haven't done a year recap or resolutions post in the past, as many sewing bloggers do, but I'm going to start this year, for my own sanity and fulfillment if not for your curiosity. :-)
I haven't been very organized with tracking my finished things, so I'll save my first yearly recap for the end of 2010. As for my resolutions...
Crafting related:
1. Blog consistently. I enjoy my little blog and the encouragement I get from it. As all bloggers do, I really love getting comments. :-) My goal is posting at least twice a week. Not a difficult goal to meet, I don't think. If I have no sewing or knitting projects going, be prepared to hear about my attempts to make my personal style more interesting!
2. More "crafty" sewing. I have recently completed one throw pillow cover for my living room. Three more to go. I also want to finish up my older son's quilt and maybe start on one for my baby in the fall. I just want to do a little more general crafty sewing cuteness instead of only cranking out the clothes.
3. Sew and knit from stash (almost) exclusively. Many sewing and knitting bloggers make this resolution. I need to this year because a) I'm looking forward to a move this summer (YEA!) and don't need any more stash to move, b) I'm trying to be more frugal - just a personal goal, and c) I just can't claim to NEED any more fabric at the moment, and the stash is at a point that may soon start to cause marital drama despite my very kind and understanding husband. Lining notions, and trims are exempt from this goal, and I'll allow myself a tiny bit of leeway - maybe one cut of fabric every two months to sew up immediately.
So, I think these are achievable goals. Maybe writing them down here will hold me more accountable to myself.
1 non-crafting related resolution:
1. STOP BITING MY NAILS. :-) This has been my personal quest since I was a child. I succeed for a few months and then fall off the wagon. My most recent period of nice, long nails was about July-September this year. I can do it again. Starting today.
If you've read this far, thanks. :-) I have a sewn and knitted ensemble to show tomorrow! That's right - a two-fer!